
To mount your dash cam in a truck without shaky footage, start by choosing a stable spot behind the rearview mirror that’s free of obstructions and well-positioned. Clean the surface thoroughly and use a high-quality, impact-resistant mount with vibration dampening features. Secure the device firmly, and add padding or anti-vibration accessories to absorb bumps. Regularly check the setup to keep footage smooth—stick with these tips, and you’ll achieve steady recordings every time.
Key Takeaways
- Mount behind the rearview mirror to reduce vibrations and ensure a clear, stable view of the road.
- Prepare and clean the mounting surface thoroughly for strong adhesion and long-term stability.
- Use vibration-dampening mounts and pads to absorb shocks from rough roads and minimize footage shakiness.
- Adjust the camera angle carefully, testing in different lighting to avoid glare and reflections.
- Regularly check and tighten the mount and cables to maintain stability and prevent movement during drives.

Mini Body Camera with Audio and Video Recording, POV Camera with 64G Card Body Worn Cam ,Wearable Patrol Video Recording Camcorder With Night Version ,Camcorder for Security Work Records Traveling
【FHD 1080P Camera】Kaysunlink A18 body camera captures videos and photos in stunning FHD resolution. The Bodycam recorder is...
As an affiliate, we earn on qualifying purchases.
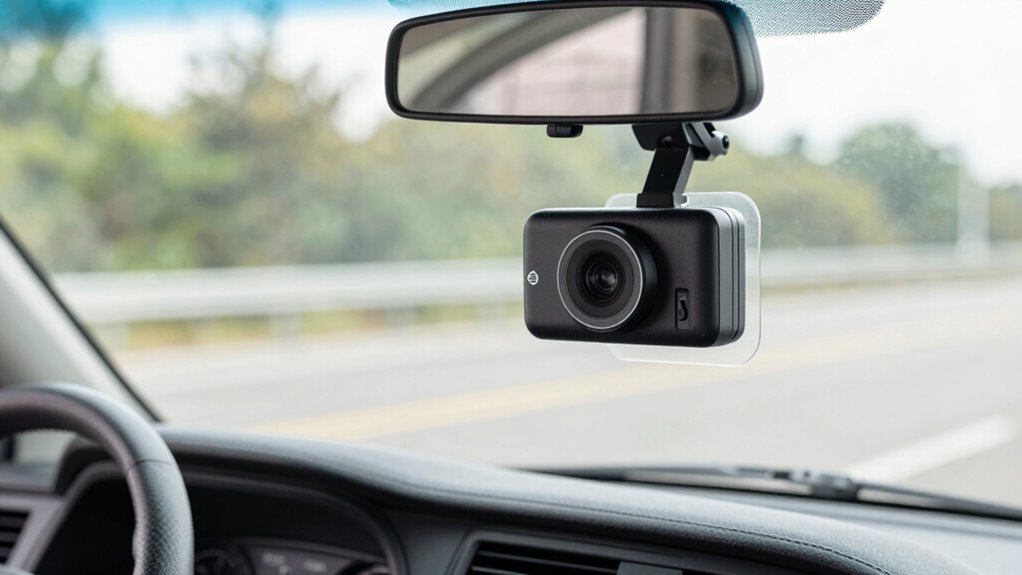
Choose the Right Mounting Location

Choosing the right mounting location is essential for capturing clear footage and ensuring your dash cam doesn’t interfere with your driving. You want a spot that minimizes distractions and keeps your dashboard aesthetics clean. Position the camera where it won’t block your view of the road or blend into the interior lighting, which can cause glare or reflections. Ideally, mount it behind the rearview mirror, so it’s unobtrusive but still captures the road ahead. Consider the angle and height to reduce shaky footage caused by bumps or turns. A well-chosen location also prevents accidental bumps or vibrations from affecting video quality. Keep the area tidy and free of loose wires, so your setup remains sleek and functional without disrupting your vehicle’s interior design. Additionally, understanding field-of-view can help you select a position that maximizes coverage while minimizing blind spots. Remember that camera stabilization features can further improve footage quality when mounted correctly. Paying attention to vibration dampening techniques can also help maintain steady footage during rough drives. Properly securing the mount with shock absorption methods can further reduce vibrations and enhance video clarity. Incorporating mounting accessories such as brackets or pads can also improve stability and footage quality during uneven terrain.

Meoilkolnm Mini Wearable Body Worn Action Camera, FHD 1080P, Thumb Size, Hands Free Recording with Premium Portable Camcorder Mount Anywhere for Security, Work, Guard, Travel, 128GB, Black
User Friendly: Simple Design with a button in the middle, you can easily start recording with pressing the...
As an affiliate, we earn on qualifying purchases.
Use a High-Quality Mounting Kit

Choosing a high-quality mounting kit guarantees your dash cam stays secure and reliable. Look for kits with durable materials, adjustable features, and good vibration absorption to handle the truck’s movement. Investing in a top-tier mount makes a noticeable difference in footage stability and camera longevity. Additionally, selecting a mount that considers safe installation practices ensures your dash cam operates effectively without risking damage or safety hazards.
Choose Durable Materials
Selecting a high-quality mounting kit is essential to guarantee your dash cam stays secure and functions properly. Focus on choosing materials with excellent durability, which ensures long-lasting performance despite vibrations and temperature changes. Strong materials enhance mounting strength, preventing slips or falls during rough drives. Look for kits made from impact-resistant plastics or metal components that can withstand harsh conditions. To help you decide, here’s a quick comparison:
| Material | Durability | Mounting Strength |
|---|---|---|
| Polycarbonate | High | Moderate |
| Aluminum | Very high | Strong |
| ABS Plastic | Good | Moderate |
Prioritize these durable materials for a secure, reliable mount that keeps your dash cam steady on every trip. Additionally, material properties such as impact resistance and temperature tolerance are crucial factors to consider for optimal performance. Selecting materials with excellent vibration resistance can significantly reduce shaky footage caused by engine or road vibrations. Choosing a mount with shock absorption capabilities can further enhance stability and footage clarity during bumpy rides.
Opt for Adjustable Design
An adjustable mounting kit makes it easier to position your dash cam for the best angle and visibility. With this feature, you can easily fine-tune camera angles to capture clear footage from different perspectives. It also allows you to switch between multiple viewing positions without hassle, guaranteeing you get the optimal shot regardless of your truck’s interior or exterior layout. An adjustable mount helps you find the perfect spot for your dash cam, reducing blind spots and glare. Additionally, a high-quality kit often includes options for secure mounting near various power sources, making cable management simpler. This flexibility ensures your dash cam stays firmly in place, even on bumpy roads, and that you can quickly adapt its angle when needed for better footage. Proper mounting techniques are essential for ensuring your dash cam provides reliable, shake-free recordings. Proper installation also involves selecting mounts made from durable high-quality materials, which contribute to the stability and longevity of your setup. Investing in a robust mounting system can further enhance the stability and performance of your dash cam, especially on rough roads. Incorporating vibration dampening features in your mount can significantly reduce camera shake and improve footage clarity. Moreover, choosing mounts with adjustable joints allows for precise positioning in tight or awkward spaces, ensuring comprehensive coverage.
Ensure Vibration Absorption
Since trucks are often subject to rough roads and vibrations, using a high-quality mounting kit is essential to keep your dash cam steady. A good kit absorbs shocks and minimizes camera movement, helping you maintain a clear, stable camera angle. This is especially important for capturing professional-quality footage while on the move. Look for mounts with vibration dampening features, such as rubber or gel pads, to reduce the impact of road bumps. Additionally, secure the power supply cable properly to avoid movement that could affect stability. Proper cable management also prevents vibrations from tugging on the camera, maintaining a consistent angle. Incorporating vibration dampening features into your mount ensures optimal performance across various driving conditions. Selecting a mount with shock absorption capabilities can significantly improve footage quality during bumpy drives. Using mounts with anti-shock technology can further enhance stability and image clarity. Investing in a sturdy, vibration-absorbing mount makes a significant difference in capturing smooth, high-quality footage while keeping your dash cam securely in place.

Tymate TM7 Tire Pressure Monitoring System, Wireless TPMS with 4 External Sensors & 6 Alarm Modes, Colorful Display, Real-time Tire Pressure Monitor System, Ideal for RV SUV MPV Truck Sedan(0-144 PSI)
[Accurate Real-time Monitoring & Multi-Alert System]: Tymate TM7 tpms sensor can be used to monitor your tires’ pressure...
As an affiliate, we earn on qualifying purchases.
Prepare the Surface for Better Adhesion
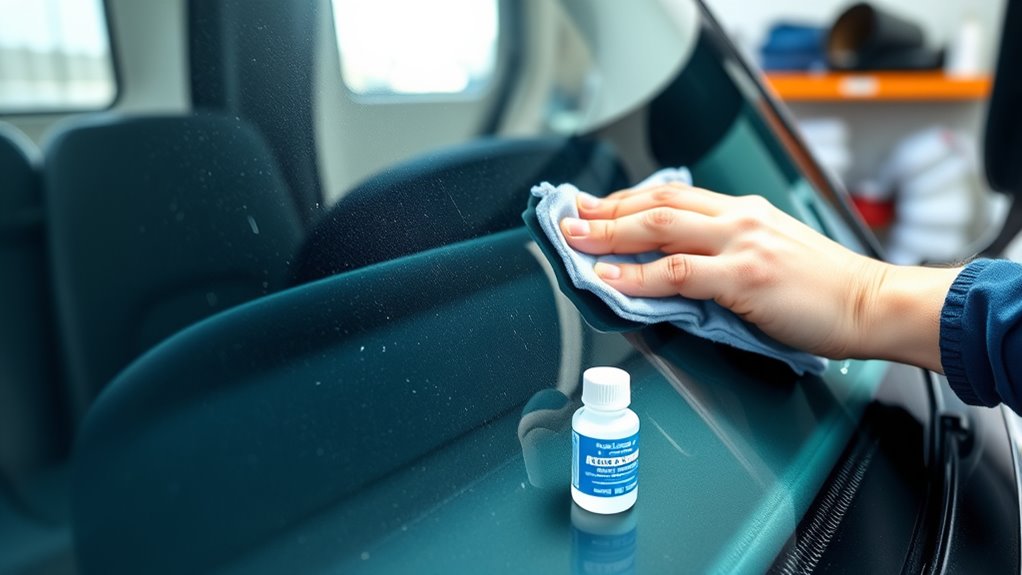
Before attaching your dash cam, it’s vital to prepare the surface to guarantee maximum adhesion. Start by thoroughly cleaning the area with a suitable surface cleaning solution, removing dust, grease, and debris that can weaken the bond. Use a microfiber cloth or alcohol wipe for a streak-free finish. Proper surface cleaning is essential for adhesion techniques to work effectively, ensuring the adhesive sticks firmly and lasts longer. Avoid touching the cleaned surface afterward to prevent oils from your skin from reducing adhesion. If needed, lightly roughen the surface with a mild abrasive pad to improve grip. Taking these steps creates a clean, smooth base for your dash cam, minimizing the risk of it falling or shifting during drives. Additionally, considering the impact of air quality on adhesion can help you choose the best cleaning products and ensure a secure mount. Environmental factors such as humidity and temperature can also influence the effectiveness of your adhesive, so choosing optimal conditions for installation can enhance durability. Being aware of surface texture can further improve the adhesion process and help you select the most suitable mounting method for your truck. Moreover, understanding surface preparation techniques and how they impact adhesion strength can significantly increase the longevity of your dash cam mount and prevent future issues.

Marcala Tire Pressure Monitoring System - Set of 4 TPMS Sensors for Trailer, RV, Camper, Truck (0-98PSI) | 32ft Extended Range Air Monitor Kit | Solar Charge & 6 Alarm Modes | Be Safe & Prevent Flats
✅ NEW SENSORS & HUB for an EXTEDED RANGE up to 32 FEET! Perfect for Large RVs, Campers,...
As an affiliate, we earn on qualifying purchases.
Secure the Dash Cam Firmly in Place

Make sure you use strong mounts that can handle the vibrations of driving. Once installed, double-check that the dash cam stays secure and doesn’t wobble. A stable setup guarantees clear footage and prevents the camera from falling out. Remember, well‑sourced coverage ensures the reliability of the information you rely on for proper installation. Additionally, choosing connected equipment designed for high-vibration environments can further enhance stability and footage clarity. Incorporating free floating mounting options can also help absorb shocks and reduce unwanted movement during transit. Ensuring your mounting system considers wall surfaces and finishes can improve overall stability and durability.
Use Strong Mounts
A strong mount is essential to keep your dash cam secure during all driving conditions. It ensures your footage stays steady, especially on bumpy roads or sharp turns. Choose mounts made from durable materials that can withstand vibrations. For added stability, opt for mounts with adjustable angles and locking mechanisms. Keep in mind your dash cam’s wireless connectivity and power supply options—secure mounts help prevent disconnections caused by movement. Here’s a quick visualization:
| Mount Type | Material | Features |
|---|---|---|
| Suction Cup | Plastic/Glass | Easy to reposition, strong |
| Adhesive Pad | Rubber/Plastic | Permanent, vibration resistant |
| Clamp Mount | Metal/Plastic | Firm grip, adjustable |
Select a mount that fits your truck’s interior and keeps your dash cam steady for clear recordings.
Double-Check Stability
Once you’ve secured your dash cam with a sturdy mount, it’s important to double-check its stability. Confirm the camera angle is ideal for clear footage and adjust if needed. Gently wiggle the camera to verify it doesn’t shift or loosen over time. Good cable management is vital—tightly secure cables to prevent tugging that could loosen the mount or disrupt the camera angle. Verify that all connections are firm and hidden from view to avoid distractions. Additionally, check that the mount isn’t obstructing your view or interfering with vehicle controls. Properly securing the dash cam reduces vibrations and prevents shaky footage. Regularly inspect the setup, especially after rough roads or long drives, to maintain a stable, high-quality recording.
Minimize Vibrations From the Truck

Vibrations from the truck can cause shaky footage and potentially damage your dash cam over time. To minimize these vibrations, start by ensuring your dash cam’s sensor calibration is accurate, which helps the device interpret movement correctly. Use anti-vibration mounts or pads designed to absorb shocks and reduce movement. Securing the power supply stability is equally important; unstable power can cause the camera to jerk or turn off unexpectedly. Check that cables are tight and well-secured to prevent them from transmitting vibrations to the camera. Additionally, consider adding a vibration dampening bracket or padding behind the mount for extra stability. These steps will help keep your footage steady and protect your dash cam from long-term damage caused by persistent vibrations.
Test and Adjust for Steady Footage
To guarantee your dash cam records smooth, clear footage, you need to test and adjust its positioning after installation. Check the camera angle to ensure it’s capturing the road ahead clearly, without unnecessary gaps or obstructions. Pay attention to lighting conditions—bright sunlight or shadows can affect footage quality. Adjust the position if glare or reflections interfere with visibility. Here are some tips to contemplate:
- Tilt the camera downward slightly to avoid sky or dashboard reflections.
- Ensure the lens is centered for a balanced view.
- Test footage during different times of day for lighting consistency.
- Use manual camera controls if available to optimize exposure.
- Confirm the mount is secure to prevent shifts during driving.
Frequently Asked Questions
Can I Mount the Dash Cam on a Curved or Uneven Surface?
Yes, you can mount a dash cam on a curved or uneven surface. To do so, adjust the mounting angle to guarantee the camera faces forward clearly. Use mounting accessories like adjustable brackets or adhesive pads designed for textured surfaces. Make certain the surface texture provides enough grip, and avoid mounting on overly unstable or slippery spots. This way, your footage stays steady and clear, even on tricky surfaces.
What Types of Adhesives Are Best for Different Truck Interiors?
You should choose adhesives with high durability, like 3M VHB tape or industrial-strength double-sided tape, which work well on truck interiors. Before applying, make certain proper surface preparation by cleaning and drying to maximize adhesion. Some adhesives work better on plastics, while others suit metal or textured surfaces. Don’t worry about vibration—these adhesives are designed to stay secure even on bumpy rides, keeping your dash cam steady.
How Do Ambient Temperatures Affect Adhesive Performance?
Ambient temperatures greatly impact adhesive durability and temperature sensitivity, so you need to take into account the climate. In high heat, adhesives may soften or lose grip, risking shaky footage. Cold temperatures can make adhesives brittle, reducing their sticking power. To guarantee a secure mount, choose adhesives designed for your truck’s climate, and avoid extreme temperatures during installation. Properly selecting temperature-resistant adhesives will help keep your dash cam steady and footage clear.
Is It Possible to Remove and Reposition the Dash Cam Easily?
Yes, you can remove and reposition the dash cam easily. Most dash cams have a quick-release mechanism or suction cup mount that allows you to detach it without hassle. When removing the dash cam, be gentle to avoid damaging the adhesive or mount. Repositioning is straightforward—just clean the surface, reattach the mount, and secure the camera in your desired position, ensuring it stays steady for clear footage.
How Can I Prevent Glare From Sunlight on the Camera Lens?
To prevent sun glare on your dash cam lens, you should use a lens hood or attach a glare shield. Position the camera away from direct sunlight whenever possible, and consider using a tinted or UV-protective lens cover for added lens protection. Regularly clean the lens to remove smudges or dirt that can worsen glare. These steps help guarantee clear footage and sustain peak camera performance.
Conclusion
By following these steps, you’ll guarantee your dash cam stays steady and captures clear footage. Remember, studies show that properly mounted dash cams reduce footage distortion by up to 60%, making your recordings more reliable. Taking the time to select the right spot, use quality equipment, and minimize vibrations will give you peace of mind on every trip. With a bit of effort, you’ll enjoy sharp, shake-free recordings that stand the test of time.