You should avoid mounting your camera near the top edge of the windshield, especially close to dotted “frit” areas, as these can cause glare, distortion, and image interference. Steer clear of tinted zones, curved sections, and corners where reflections and glare are more likely. Installing in these spots can reduce visibility and damage footage quality. Keep your camera away from these problematic areas to guarantee clear footage and peak performance—more tips await if you stay tuned.
Key Takeaways
- Avoid mounting near the top edge of the windshield where dotted “frit” areas cause glare and calibration issues.
- Do not place cameras on or adjacent to dense frit dots, as they cause distortion and visual interference.
- Refrain from installing in heavily tinted zones, especially near edges and frit areas, to prevent glare and reduced visibility.
- Keep cameras away from side mirror areas and corners to avoid distortion, glare, and blind spots caused by frit or tint.
- Avoid mounting on curved windshield surfaces, which can misalign the camera and impair image quality near tinted or frit zones.
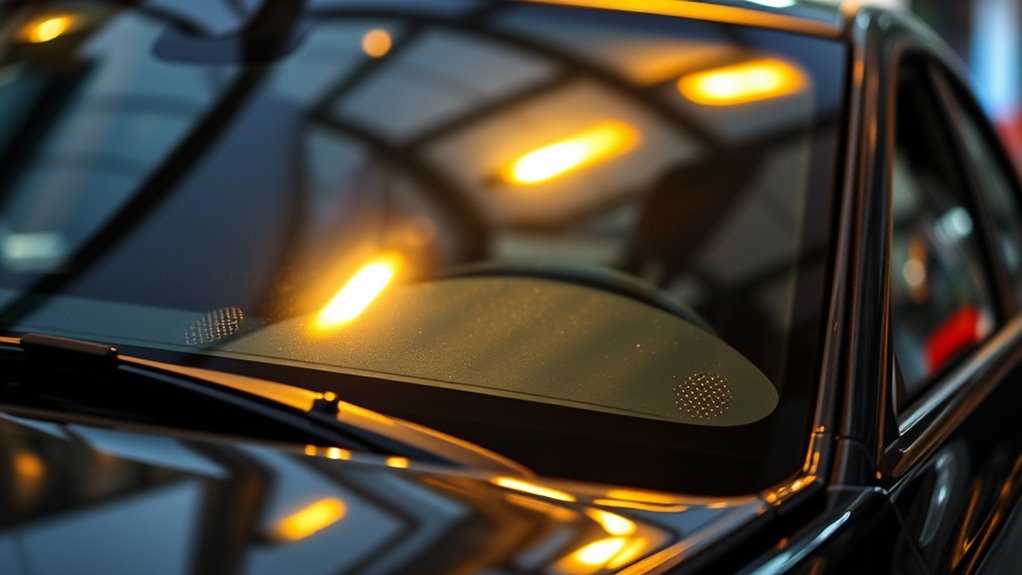
Avoid Positioning Cameras Near the Top Edge of the Windshield
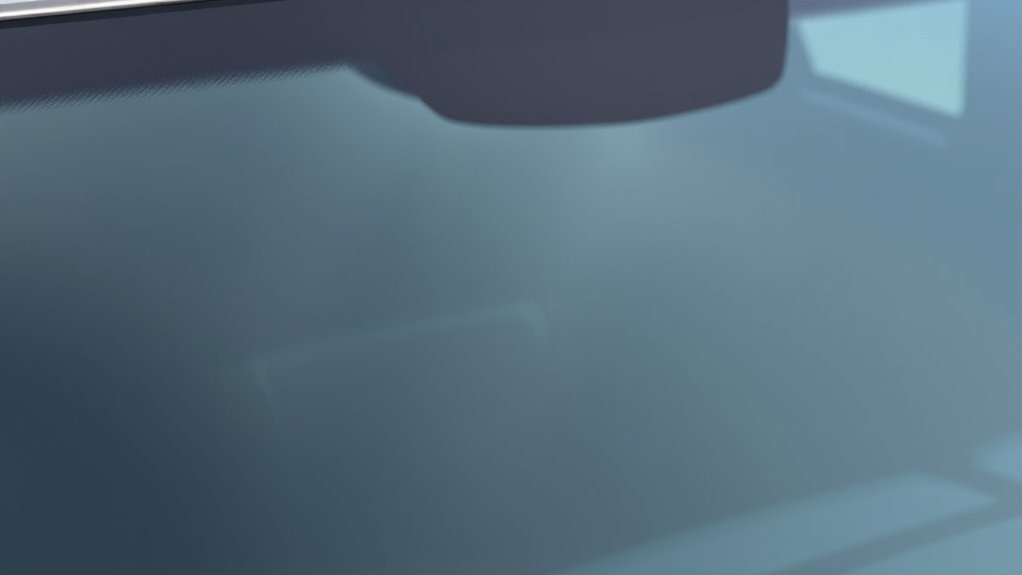
Placing cameras too close to the top edge of the windshield can cause problems with image quality and durability. When mounted near the top, the camera’s sensor calibration may be thrown off by uneven lighting or tinting, leading to inaccurate readings. Additionally, lens distortion becomes more pronounced if the camera isn’t aligned properly, resulting in warped images. This distortion can hinder your ability to interpret footage accurately. The dotted “frit” area acts as a natural barrier, preventing suitable positioning close to the edge. To guarantee clear, reliable footage, position your camera lower, away from the top edge. Proper placement minimizes issues with sensor calibration and lens distortion, ensuring your camera captures high-quality images and maintains long-term durability. High-quality images depend heavily on optimal camera positioning and calibration for the best results. Additionally, understanding how sensor calibration is affected by placement can help you achieve more accurate footage over time. Proper alignment and consideration of lens distortion are essential for maintaining image integrity in various lighting conditions. Being aware of vehicle windshields and their unique features can further guide you in choosing the ideal camera location. Moreover, awareness of windshield tinting can influence the placement to avoid compromised image clarity.
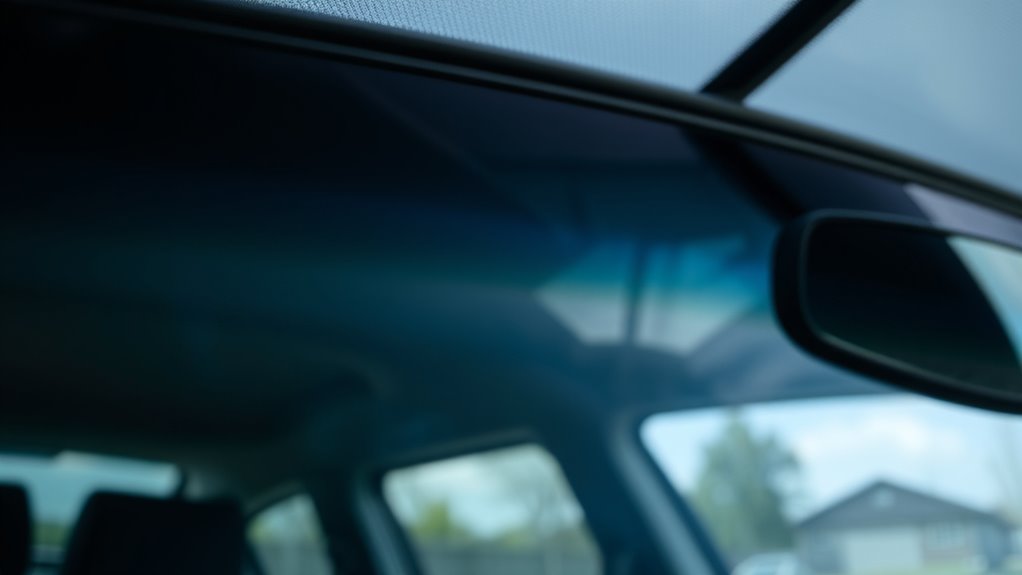
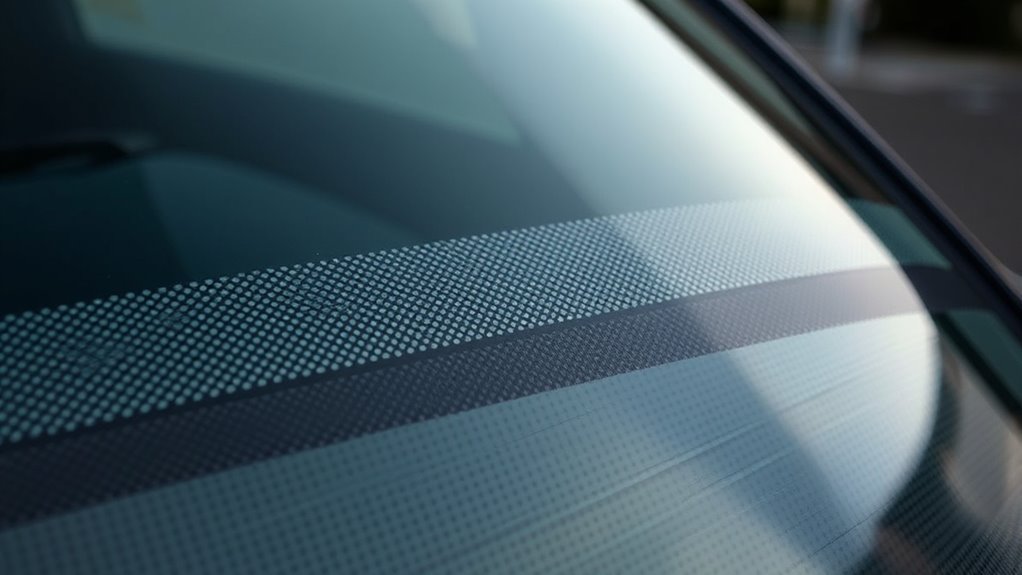
Do Not Place Cameras Too Close to the Dotted “Frit” Area
While it might seem convenient to position your camera near the dotted “frit” area, doing so can compromise image quality and camera longevity. The frit often causes interference with camera signals, leading to distorted images or data loss. Additionally, placing a camera too close can create glare issues, especially in bright sunlight, reducing visibility and detail. To avoid these problems, keep your camera at a safe distance from the frit zone. Here’s a quick comparison:
| Aspect | Near Frit Area | Safe Distance | Effect |
|---|---|---|---|
| Frit interference | High risk | Minimal risk | Clearer signals |
| Glare issues | Increased glare | Reduced glare | Better image quality |
| Image clarity | Possible distortion | Sharp, undistorted images | |
| Camera lifespan | Shortened due to interference | Longer durability |
Position your camera thoughtfully to ensure ideal performance.
Steer Clear of Mounting Cameras on the Curved or Tinted Sections
Mounting your camera on curved or tinted sections of the windshield can cause significant issues with image quality and camera performance. When you’re mounting on curved surfaces, the lens may not stay aligned properly, leading to distorted or blurry footage. Installing on tinted sections can interfere with the camera’s ability to capture clear images, especially if the tint is reflective or dark. Tinted areas, especially near the edges or dotted “frit” zones, can reduce light transmission, impacting image clarity. Avoid placing your camera on these sections to guarantee peak performance. Instead, choose flat, clear areas of the windshield that won’t compromise the camera’s field of view or image quality. Proper placement guarantees better footage and easier installation.
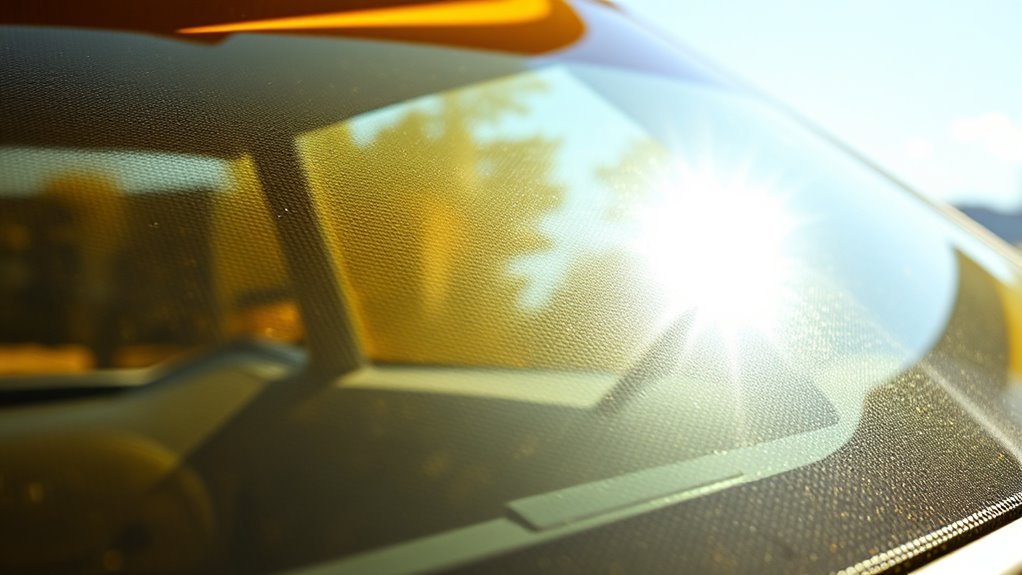
Refrain From Installing Cameras Where Glare Is Most Likely
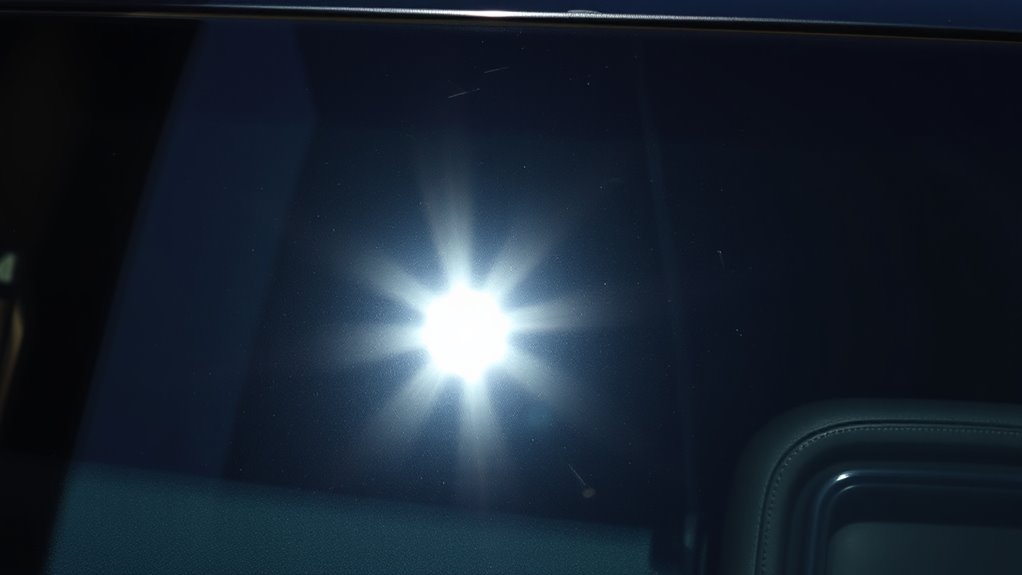
Avoid installing cameras near the edges of your windshield, especially where glare is common. Keep away from frit dots, as they can reflect light and cause visual issues. Choosing the right spot helps make certain your camera works effectively without interference. Additionally, selecting locations that minimize glare can help maintain clear visibility and better capture footage. Proper camera placement is essential for optimal performance and safety. Being aware of visual obstructions can further enhance your camera’s effectiveness by preventing coverage blind spots, which is especially important in backyard transformation settings where outdoor elements can interfere with camera angles. Incorporating connected device awareness can assist in choosing optimal spots and avoiding problematic reflective surfaces.
Avoid Windshield Edges
Installing cameras near the edges of your windshield can lead to issues with glare and distorted images. The edges often have windshield adhesives and frit dots that interfere with camera adhesion and clarity. These areas are prone to glare from sunlight or headlights, which can cause reflections and reduce image quality. Additionally, the uneven surface and adhesive residues can make it difficult for cameras to mount securely. Positioning your camera too close to the edges risks poor alignment and compromised footage. To guarantee peak performance, avoid placing cameras where glare is most likely, especially near the windshield’s edges. Keep your camera centered and away from these problematic zones to prevent glare interference and maintain clear, reliable footage.
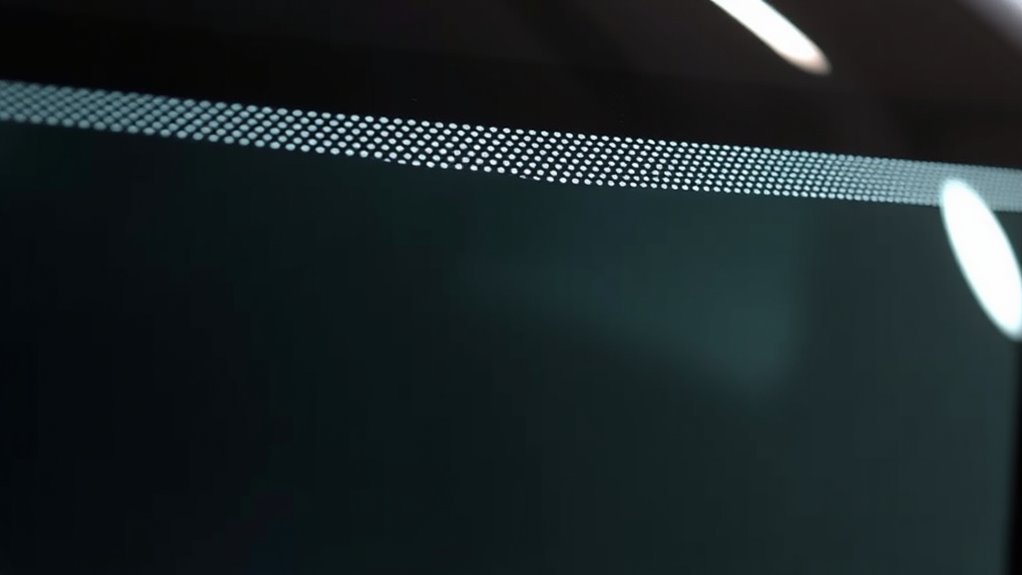
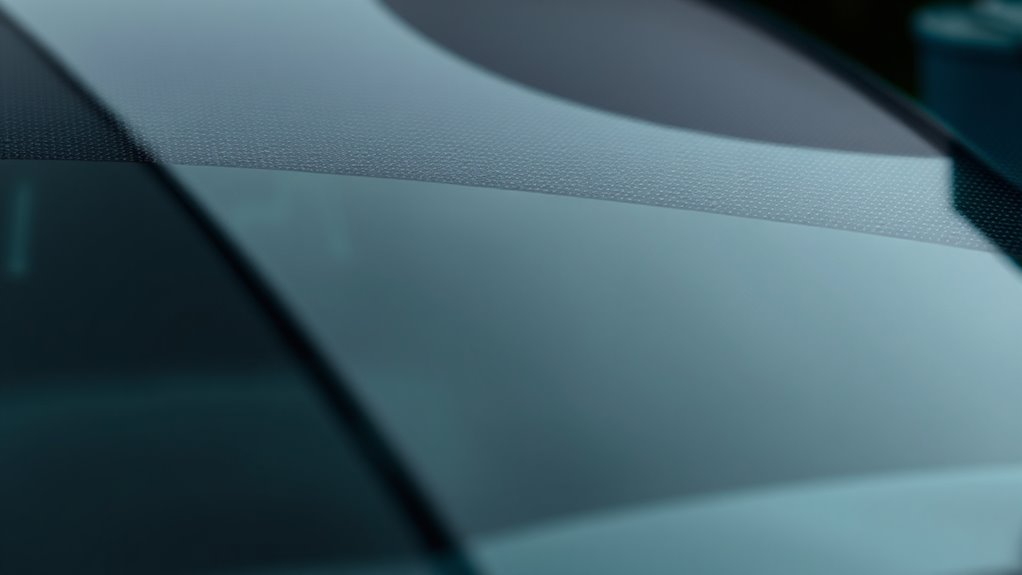
Steer Clear of Frit Dots
Since frit dots are densely packed near the edges of your windshield, they can create significant glare issues for your camera. The frit pattern, designed to hide adhesive and provide UV protection, can reflect light and cause glare that hampers image quality. Avoid installing cameras over tinted zones with concentrated frit dots, as these areas are prone to glare and distortion. To help visualize, consider this table:
| Frit Pattern Area | Typical Location | Glare Potential |
|---|---|---|
| Edge Dots | Outer windshield edges | High |
| Central Dots | Center of windshield | Low |
| Corner Dots | Top corners | Moderate |
| Bottom Dots | Near dashboard | Low |
| Middle Zone | Center strip | Minimal |
Stay clear of these frit dot areas to ensure ideal camera performance and minimize glare issues. Additionally, understanding the frit pattern’s purpose can help you identify safer zones for camera placement.
Keep Cameras Away From the Edges of the Tinted Zone
To get the clearest camera footage, keep your cameras away from the edges of the tinted zone. Placing them too close can cause frit edge effects that distort images or create unwanted reflections. By positioning cameras carefully, you reduce glare and improve image quality.
Avoid Frit Edge Effects
Keeping cameras away from the edges of the tinted zone is essential to avoid frit edge effects. When positioning your camera, ensure sensor placement stays clear of the dotted frit area, as proximity can cause false reflections or glare. Proper camera orientation helps prevent light distortion at the frit border, maintaining image clarity. To illustrate, consider this table for guidance:
| Camera Position | Sensor Placement | Effect on Image |
|---|---|---|
| Centered | Well within zone | Clear, sharp images |
| Near edge | Close to frit | Increased glare, distortion |
| Outside zone | Avoided frit zone | No edge effects |
| Oblique angle | Adjusted for frit | Reduced reflections |
| Direct on edge | Too close to frit | Frit edge effects |
Keeping these factors in mind helps you avoid frit edge effects and ensures ideal image quality.
Minimize Reflection Interference
Reflective surfaces near the edges of tinted zones can cause significant glare and interfere with image clarity. Sun glare bouncing off these surfaces creates unwanted reflections that can obscure your shot. To minimize tint interference, keep your camera away from the edges of the tinted area, where reflections are most intense. Positioning your camera too close to tinted zones increases the risk of capturing glare or distorted images. Instead, place your camera slightly inward, away from the edges, and angle it to avoid direct reflection paths. Using polarized filters can also reduce glare caused by sunlight and reflective surfaces. By staying mindful of the tinted zone edges, you’ll improve image quality and avoid the pitfalls of sun glare and tint interference.
Do Not Attach Cameras to Areas With Complex Frit Patterns
Attaching cameras to areas with complex frit patterns can cause imaging issues and compromise the camera’s effectiveness. The intricate frit pattern and complex designs can create visual interference, making it hard for the camera to capture a clear image. These patterns disrupt light transmission and cause reflections or distortions that impair video quality. To understand this better, consider the table below:
| Frit Pattern Type | Impact on Camera | Recommended Action |
|---|---|---|
| Dense Dots | Obstructs view | Avoid mounting here |
| Wide Spaced Dots | Minimal interference | Mount with caution |
| Complex Designs | High distortion | Do not attach cameras here |
| Simple Frits | Clear view | Suitable for mounting |
Additionally, technological influences on artistic expression can affect how camera equipment interacts with various design patterns.
Avoid Mounting Cameras in Zones With Heavy Reflection Risks
Mounting cameras in areas with heavy reflections can cause glare from tinted glass or frit dots, making footage unclear. These reflections can create distracting light spots that interfere with image quality. To guarantee clear recordings, choose mounting zones with minimal glare risks. Additionally, consider the ventilation considerations in the area to prevent condensation buildup that could further impair camera performance.
Glare From Tinted Glass
Glare from tinted glass can considerably impair camera visibility, making it difficult to capture clear images or footage. Tinted windows often have UV protection that reduces glare, but heavy reflections still create troublesome bright spots. These reflections can wash out details and cause visibility reduction, especially during bright sunlight or when the glass surface faces direct light sources. Mounting a camera in zones prone to glare increases the risk of losing important visual information. To avoid this, choose mounting locations away from highly reflective tinted areas, especially where sunlight hits directly. Reducing glare ensures better image quality and more reliable footage. Keep in mind that even with UV protection, excessive reflection from tinted glass can compromise your camera’s performance.
Frit Dot Reflection
Heavy reflection from frit dot areas on tinted windshields can substantially hinder camera performance. Frit dot reflection often creates intense glare, making it difficult for cameras to focus and capture clear images. To avoid issues, consider these points:
- Mount cameras away from frit dot zones to minimize windshield glare.
- Be aware that reflective frit dots can produce hotspots, impairing image quality.
- Use polarized filters to reduce frit dot reflection when mounting near dotted areas.
- Test camera placement in different lighting conditions to identify zones with heavy frit dot reflection.
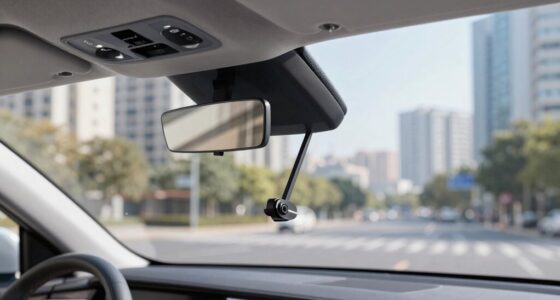
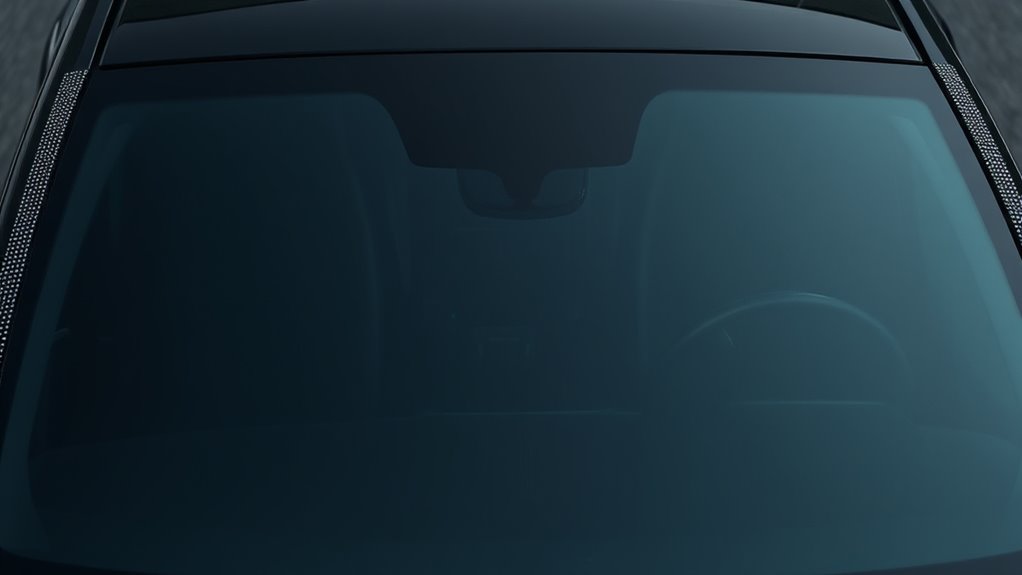
Steer Clear of the Area Behind the Rearview Mirror

To guarantee your visibility isn’t obstructed, it’s best to keep the area directly behind your rearview mirror clear of tint and dotted “frit” areas. This zone is vital for unobstructed viewing and proper sensor function. Avoid applying tint or dots right behind the rearview mirror, especially over the area used for dashboard mounting. Obstructions here can interfere with your rearview mirror’s ability to provide a clear view and may disrupt sensors or cameras positioned nearby. Keep this space free of any adhesive films or decorations that might reflect or block light. Maintaining a clean, transparent area behind the mirror ensures you get the best visibility and prevents issues with advanced driver-assistance systems that rely on clear lines of sight. Additionally, preserving this area helps maintain the integrity of the vehicle’s sensor systems, ensuring safe operation. In some cases, improper tinting can also affect camera calibration, leading to potential malfunctions of safety features. Ensuring this space remains unobstructed supports the proper functioning of driver-assistance features and enhances overall safety. To further prevent malfunctions, regularly inspect this area for any debris or smudges that could impair sensor accuracy, especially since sensor performance is sensitive to surface cleanliness.
Do Not Position Cameras Near the Corners of the Windshield
Positioning cameras near the corners of the windshield can cause distortion and blind spots, making it harder to rely on their footage. Corner mounting or side placement often results in compromised image quality and obstructed views. To avoid these issues, keep your camera away from the following areas:
- Near the side edges, where tinted or dotted frit areas interfere with clarity. These areas often contain markings or coatings that can distort images or reduce visibility.
- Close to the side mirrors, which can create glare and obstruct the field of view.
- Adjacent to the A-pillars, where framing distortions may occur. Proper placement here can help prevent image distortion and improve recording quality.
- In the lower corners, where the windshield’s curvature distorts footage. Using Suprem fabric for camera mounts in these zones can enhance durability and stability. Additionally, understanding the windshield curvature can assist in selecting optimal mounting locations.
Ensuring proper placement can also help maintain the integrity of the camera’s image quality and improve overall reliability. Proper placement not only preserves clarity but also enhances camera effectiveness by reducing potential blind spots.
Sticking to central, unobstructed areas ensures better image quality and reliable recordings. Proper placement is essential for maximizing camera effectiveness and avoiding blind spots caused by windshield features.
Avoid Placing Cameras in Locations That Block Driver Visibility
Placing cameras where they can block your view of the road can create dangerous blind spots. Avoid dashboard placement that obstructs your line of sight, especially near the steering wheel or instrument cluster. Interior camera positioning should be carefully considered to prevent interference with your view through the windshield. If a camera is mounted too high or too low, it can limit visibility or cause reflections that distract you while driving. Always verify your camera setup doesn’t interfere with your ability to see traffic signals, pedestrians, or other vehicles clearly. Keep the camera out of your direct line of sight, and test the view from your normal driving position before finalizing installation. Your safety depends on unobstructed visibility at all times. Be aware that privacy policies may influence how your camera footage is stored or shared. Additionally, ensuring your camera setup aligns with vehicle safety standards helps maintain optimal driving conditions.
Frequently Asked Questions
Can Mounting Cameras on Tinted or Dotted Areas Damage the Device?
Mounting cameras on tinted or dotted areas can cause frit damage and tint interference, potentially harming your device. The dotted “frit” areas are designed to block UV rays and heat, which can affect camera stability and function. Additionally, the tint can interfere with signals or image quality. To avoid damage, it’s best to mount your camera on clear, unobstructed glass, ensuring ideal performance and longevity.
Are There Legal Restrictions on Camera Placement on Vehicle Windshields?
Think of legal restrictions on camera placement like guardrails guiding your journey; they keep you on the right path. You must check your local laws before installing cameras on your windshield, as many regions restrict placement near the driver’s line of sight or on tinted and dotted areas. Always guarantee your camera doesn’t obstruct your view or violate regulations, preventing fines or legal trouble. Stay informed to keep your road ahead smooth.
How Does Temperature Affect Camera Performance in Tinted Regions?
Temperature impacts your camera’s performance in tinted regions by causing thermal expansion, which can shift the camera’s position or alignment. This movement may lead to optical distortion, affecting image clarity. Hotter temperatures expand the glass and tint layers, reducing stability, while cold temperatures contract them. Always consider these effects when installing cameras in tinted areas, and verify proper mounting to minimize optical distortion caused by temperature fluctuations.
What Types of Mounts Are Safest for Fragile or Complex Frit Areas?
You should opt for mounts that use low-adhesive strength pads or suction cups designed for delicate surfaces, guaranteeing you don’t damage fragile or complex frit areas. These mounts maintain high mounting durability while minimizing adhesive stress, reducing the risk of peeling or cracking the frit. Always test your mount on a small, inconspicuous spot first to ensure it won’t compromise the integrity of the glass or frit surface.
Does Camera Placement Impact Windshield Warranty or Integrity?
Camera placement can affect your windshield warranty and its integrity. If you stick a camera in the wrong spot, especially near the dotted “frit” areas or tinted sections, it can cause damage or weaken the glass. Always choose safe mounting locations that avoid these sensitive zones. Proper placement guarantees your camera stays secure without risking cracks or voiding your windshield warranty, keeping your vehicle protected and functional.
Conclusion
To keep your camera working smoothly, avoid mounting it near tinted zones, dotted frit areas, or curved sections of the windshield. Sure, it might seem tempting to place it just behind the rearview mirror or at the top, but glare and reflections can ruin footage. Trust me, taking a few extra minutes to choose a clear spot guarantees better footage and safer driving. Don’t let poor placement compromise your camera’s performance—think ahead and mount smartly.